

Here is the original post from November 10, 2010:
How do you warm up YOUR bit in cold weather? Are you a hand holder? A jacket-tucker? An armpit squeezer? A breather?
Do you have one of these fancy things:

Or perhaps one of these:

I am usually the girl that wears the bridle around her neck inside her jacket/vest while tacking up, which is easier with my western bridle than my English because the reins snap off/on and there's no browband. It works, but I find it somewhat cumbersome. And as much as I'm okay with "takin' one for the team" when necessary, if that bit is too cold to put in his mouth, it's probably too cold to put inside my jacket. To me, a $40 electric bit warmer is not necessary, but I do want to get that bridle out of my coat.
So I made a microwaveable and reusable bit warmer. And I will now show you how I did it. I hunted around for a tutorial but couldn't find one. I found lots of tutorials on homeopathic hand warmers and sort of modified what I saw there with what I saw in ready-made bit warmers.
Please bear with me. I've never done this kind of tutorial before. PLEASE feel free to ask any questions. You can comment or email me at overanxioushorseowner@gmail.com. If you click on the photos they should open larger in another window. The black on black makes it hard to see, sorry.
I used a scrap of polarfleece, 2" of sew-on hook-n-loop tape (velcro is a brand name... this was cheaper), rice, and my sewing machine. I suppose you could do it by hand if you really wanted to. Don't use anything with glue/adhesive, especially the hook-n-loop tape. It won't stick so you'll have to sew it and sewing through that sh*t is a one-way ticket to frustrationland... trust me on this one.

Fabric: Be wary of synthetic fabrics as they can melt if they get too hot. Plain weave cotton is actually the safest, but I wanted more insulation and I already had the fleece in my stash. It seems to be just fine after a minute in the microwave. The other bonus of fleece is that you don't need to treat the edges as they will not unravel, so you can be cruder with your construction techniques. For instance, you really don't need to turn the seams inside, but you would need to if you use woven cotton.
Filler: Flax seed, Rice, field corn, and oats were all suggested on some of the tutorials but I also found warnings that flax seed can burn. We had a "salt bag" when I was a kid and I think Kosher salt would work, just heat thoroughly in a dry pan first, before sewing into the bag.
1. Decide what size to make it. Most bits are around 5" or 5.5". If you use a ported or otherwise bulky mouthpiece, you will want to consider that, too. Then add for seam allowance. I cut my fleece 6" x 9" and used approximately 1/4" seams.

2. Place your velcro. It will be much easier to sew without the rice involved! Keep the velcro inside of where your seams will go, about 1/2" to 3/4" from the edges. The "male" (rougher & pokier) side goes on TOP. Don't ask me why, I don't make the rules I just teach them. I just did a box stitch, but you can give it an "X" through the middle if you want extra stability, but this won't be under much stress.

3. Place your two pieces "right" sides together and stitch along the sides and bottom. Clip your corners and turn "right" sides out. With the Polarfleece you COULD place the fabric "wrong" sides together and eliminate the step of turning right sides out - it's up to you.

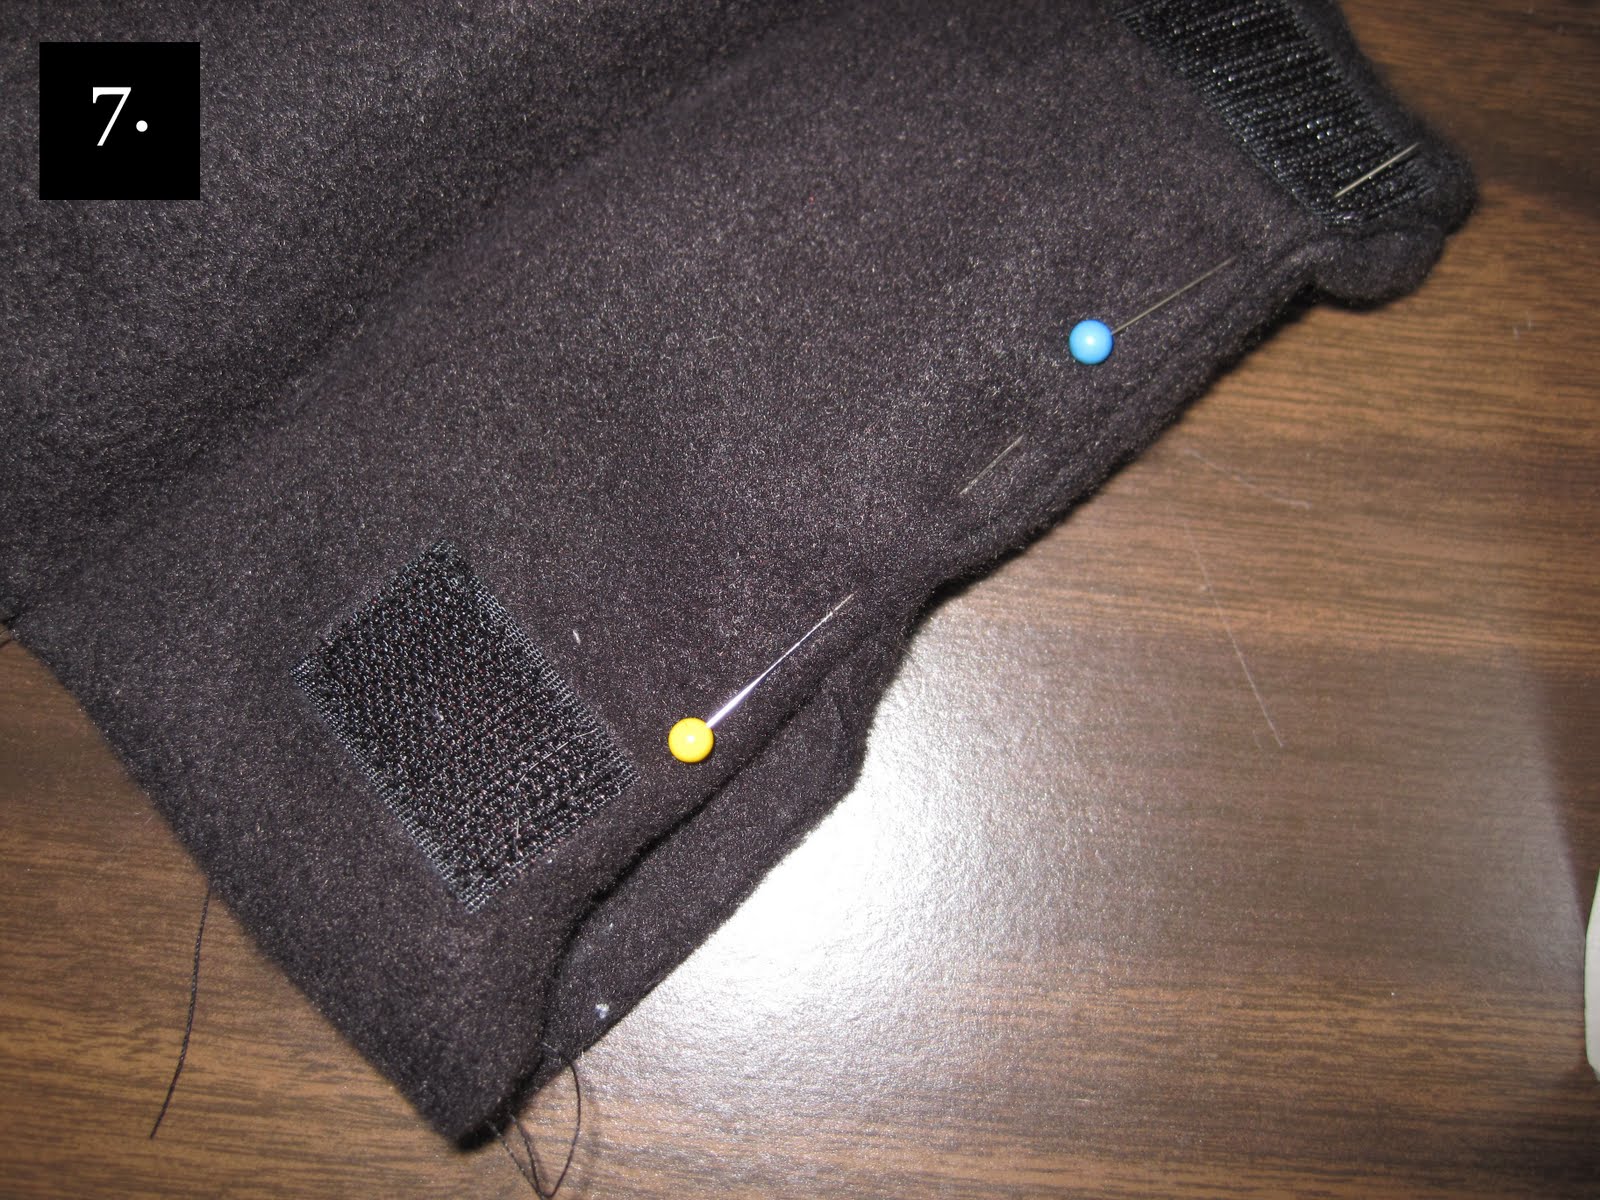
4. Double check to make sure the velcro lined up correctly. Use pins to mark where the bag will fold. This is where you will stitch to form two rice filled chambers, and one flap.

Or perhaps one of these:

I am usually the girl that wears the bridle around her neck inside her jacket/vest while tacking up, which is easier with my western bridle than my English because the reins snap off/on and there's no browband. It works, but I find it somewhat cumbersome. And as much as I'm okay with "takin' one for the team" when necessary, if that bit is too cold to put in his mouth, it's probably too cold to put inside my jacket. To me, a $40 electric bit warmer is not necessary, but I do want to get that bridle out of my coat.
So I made a microwaveable and reusable bit warmer. And I will now show you how I did it. I hunted around for a tutorial but couldn't find one. I found lots of tutorials on homeopathic hand warmers and sort of modified what I saw there with what I saw in ready-made bit warmers.
Please bear with me. I've never done this kind of tutorial before. PLEASE feel free to ask any questions. You can comment or email me at overanxioushorseowner@gmail.com. If you click on the photos they should open larger in another window. The black on black makes it hard to see, sorry.
I used a scrap of polarfleece, 2" of sew-on hook-n-loop tape (velcro is a brand name... this was cheaper), rice, and my sewing machine. I suppose you could do it by hand if you really wanted to. Don't use anything with glue/adhesive, especially the hook-n-loop tape. It won't stick so you'll have to sew it and sewing through that sh*t is a one-way ticket to frustrationland... trust me on this one.

Fabric: Be wary of synthetic fabrics as they can melt if they get too hot. Plain weave cotton is actually the safest, but I wanted more insulation and I already had the fleece in my stash. It seems to be just fine after a minute in the microwave. The other bonus of fleece is that you don't need to treat the edges as they will not unravel, so you can be cruder with your construction techniques. For instance, you really don't need to turn the seams inside, but you would need to if you use woven cotton.
Filler: Flax seed, Rice, field corn, and oats were all suggested on some of the tutorials but I also found warnings that flax seed can burn. We had a "salt bag" when I was a kid and I think Kosher salt would work, just heat thoroughly in a dry pan first, before sewing into the bag.
1. Decide what size to make it. Most bits are around 5" or 5.5". If you use a ported or otherwise bulky mouthpiece, you will want to consider that, too. Then add for seam allowance. I cut my fleece 6" x 9" and used approximately 1/4" seams.

2. Place your velcro. It will be much easier to sew without the rice involved! Keep the velcro inside of where your seams will go, about 1/2" to 3/4" from the edges. The "male" (rougher & pokier) side goes on TOP. Don't ask me why, I don't make the rules I just teach them. I just did a box stitch, but you can give it an "X" through the middle if you want extra stability, but this won't be under much stress.

3. Place your two pieces "right" sides together and stitch along the sides and bottom. Clip your corners and turn "right" sides out. With the Polarfleece you COULD place the fabric "wrong" sides together and eliminate the step of turning right sides out - it's up to you.

4. Double check to make sure the velcro lined up correctly. Use pins to mark where the bag will fold. This is where you will stitch to form two rice filled chambers, and one flap.

5. Add rice to the bottom of the bag. I think 1/4 cup is good for each chamber in this size. I didn't actually measure. I filled the bottom one too full on this first trial run. It works, just have to pull it tight to close.

6. Stitch the chamber closed, backstitching at each end. I found it helpful to pin a "seam" about 1/2" to keep the rice away from where I was sewing. Repeat for the second chamber.

7. Fold in the top of the flap and sew closed. If you left the seams on the outside in step 3 you can do so here as well.
8. Ta dum! You have a bit warmer! And a happy pony! And a happy YOU!

My test run in the house proved the bit to be warm in less than 5 minutes, and was still warm after 30 minutes. After an hour it was barely warm. My first test run at the barn was successful. I put it on the bit, went out to the field to get Junior, brought him in, groomed and tacked him and the bit was about perfect when I went to put it in. My second in-barn test failed, but it was MUCH colder in the barn and I spend goodness knows how much time effing around with a potential christmas card costume for Junior. By the time I tacked up it was stone cold. I guess you really have to get to in within that 30 minutes!
NOTES:
NOTES:
- Microwaving the rice produces "moist heat" and you might notice moisture on the outside of the bag or condensation on the bit.
- Do not expose to excess moisture - this is NOT washable.
- This bit warmer will not last forever. It is important to allow the bag to cool and dry after each use.
- If the bag does get wet, or a musty or otherwise unpleasant odor, toss it and make a new one, or just open your seams, let out the rice, launder, and re-fill.
- Do not microwave for more than 60 seconds.
Future plans: Develop a WASHABLE microwavable version. A company called "LickityBits" claims their corn filled ones are machine washable but I would be hesitant about that. Some of the bit warmers use plain old hand warmer packets but the disposable ones cost money each time you use it, and the reusable ones have to be boiled to be recharged. Why can't they make this hot/cold pack as small hand warmers?!?! The best thing would be to find microwaveable hand warmers that can be removed from the bit warmer and placed in your pockets/gloves. Once the bit is warm you warm your hands. Plus, being able to remove the packs would make the fabric part washable. Not sure if you've noticed, but I like "washable" a LOT. Someday when I'm rich and famous/win the lottery I will have a huge commercial washer and dryer in my barn ... and I would probably ruin the waterproofing by washing them every week... :)
Pretty cool - you should market it and sell it. Our bridles hang in a heated room, so that helps things out.
ReplyDeleteThankfully, our tack room is nice and toasty warm, so warming bits isn't usually an issue, but every once in a while someone will forget to put a bridle back in the tack room in between uses, so in that case, I tend to be a hand holder. This is a great idea!
ReplyDeleteYou're so crafty!! That's a really good idea, and I bet even I could make it.
ReplyDeleteMy tack room isn't heated but it is insulated. The bits stay pretty warm on an average day, but with the weather we've been having here lately, (if I was riding...) one of those would come in handy!
This is what I get for neglecting to read every entry in your blog. I was wanting to make a bit warmer for my friend for Christmas, and couldn't find a good pattern/directions anywhere! :-) I could have winged it myself, but now thanks to you I'm all set. Definitely a birthday present for the riding pal whose horsie she is nice enough to let me ride.
ReplyDelete@RiderWriter: Yay!!! I'd love to see it when you're done!
ReplyDeleteI was looking for a pattern for our 4H members to use and this is perfect! Thanks so much.
ReplyDeleteI think we may modify it so we can enclose little packets of microwavable red spring wheat.
I'm glad you can use it! I'd love to see pictures of the 4Hers making them!
DeleteJust made it, and it turned out exactly what I was looking for. Thanks for the tutorial!
ReplyDeleteCan you make it so the bag of rice comes out for washing?
ReplyDeleteThat is one of the awesome features of my new Pattern! There are links at the top of this post. :)
DeleteAwesome! I'm definetely going to make these, but I will use either a soft yellow, or a light, baby, blue would be pretty! THANKS! These are so handy, I love bit warmers! ❤
ReplyDeleteGood idea! I've been bringing the bridles in the house during the cold months.
ReplyDelete